Backup Images
It is very important that all Station Images and Rasters are backed up after every event and tour day. This provides a sense of security to the clients and allows for us to research and locate images long after the event ends.
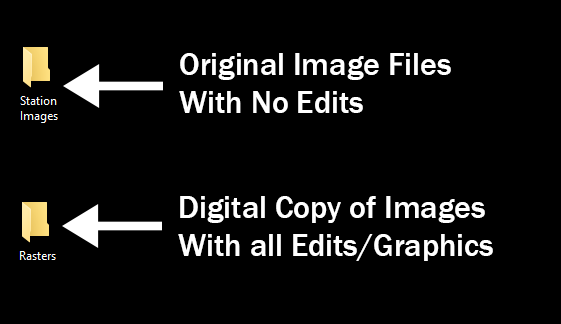
Station Images are the original image files as shot without any edits. Rasters are the same images but with all edits and graphics applied.
STEP 1:
Locate your Station Images and Raster folders on the desktop of your computer. Make sure all images from the SD card have been saved in the Station Images folder. Make sure all images have been rastered (For tours, this includes images that were not sold on site).
STEP 2:
Create The Day's File Folder on the Server
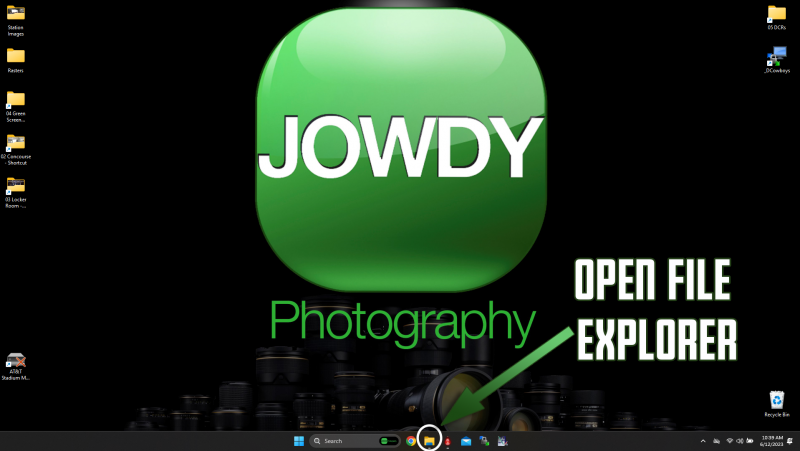
We backup all tour and stadium event photos on the AT&T Stadium Main Storage drive located on the stadium server. You will need to open File Explorer to navigate to the correct location.
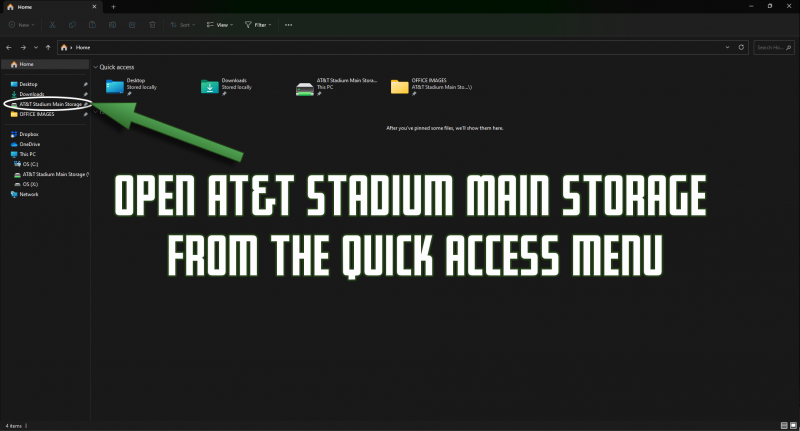
Use the Quick Access Menu to open AT&T Stadium Main Storage.
Note: Depending on your version of Windows, your view may look a little different but the process is the same.
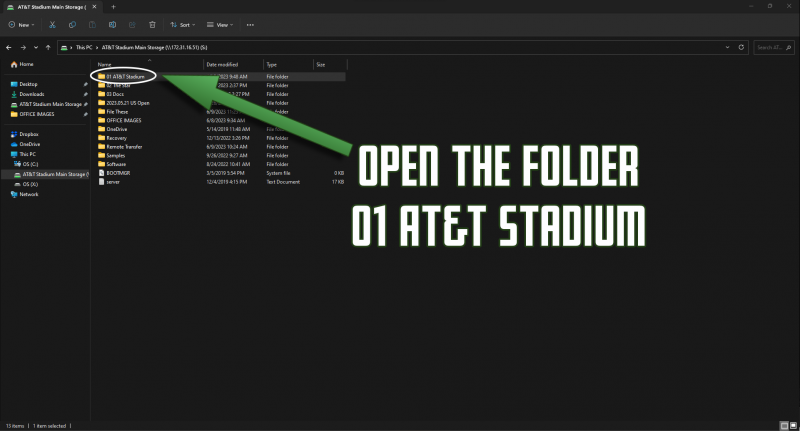
Once inside AT&T Stadium Main Storage, you will open the folder named 01 AT&T Stadium.
Note: Events that happened at The Star in Frisco will instead go into 02 The Star.
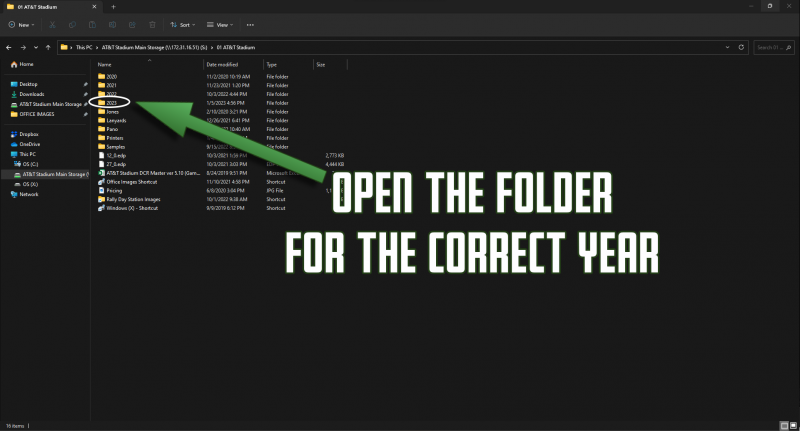
Open the folder for the correct year.
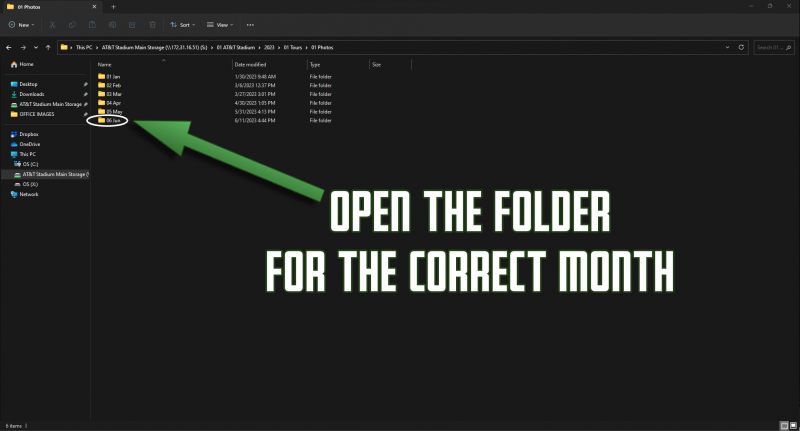
Open the folder of the correct month.
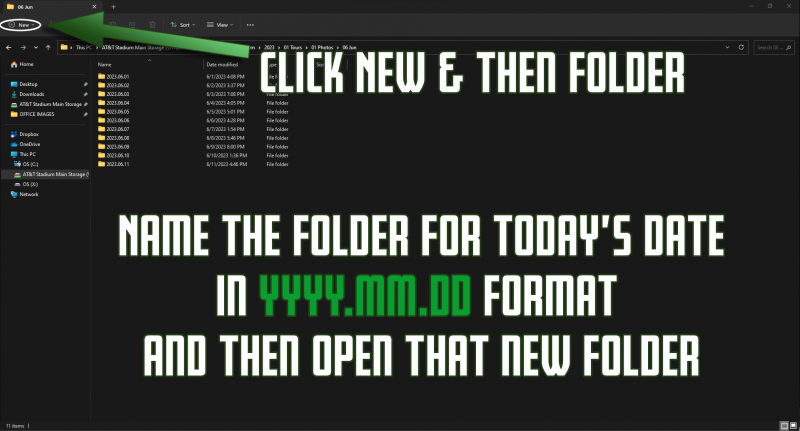
Now you will need to create a folder for today's images. On the top Left of the File Explorer window, Click "New +" and then click "Folder."
When the new folder appears, you will need to name the folder today's date in the YYYY.MM.DD format. In example: If today's date is June 12, 2023 then you will name the folder 2023.06.12
Note: If using an older version of Windows, on the top left of the window you will need to click "File" then "Folder" and then name it.
STEP 3:
Move The Image Files
In today's folder, you will create a folder called Station Images and a folder called Rasters
You can then open your Station Images folder and Rasters folder located on the desktop.
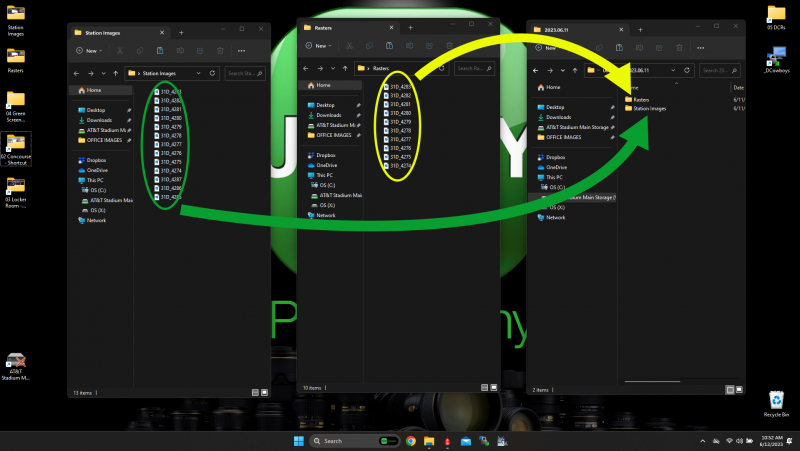
Shrink down your windows so that you can see them all and then MOVE the photos from your Station Images folder on the desktop, to the Station Images folder you created in today's folder. Once moved, repeat the same process for the Raster folder.
When finished, the Station Images and Raster Folders should still be on the desktop but will be empty.
Note: If a pop up states a file already exists with that name and asks if you want to overwrite or skip, select SKIP and then delete the image from the Station Image or Raster folder on the desktop.
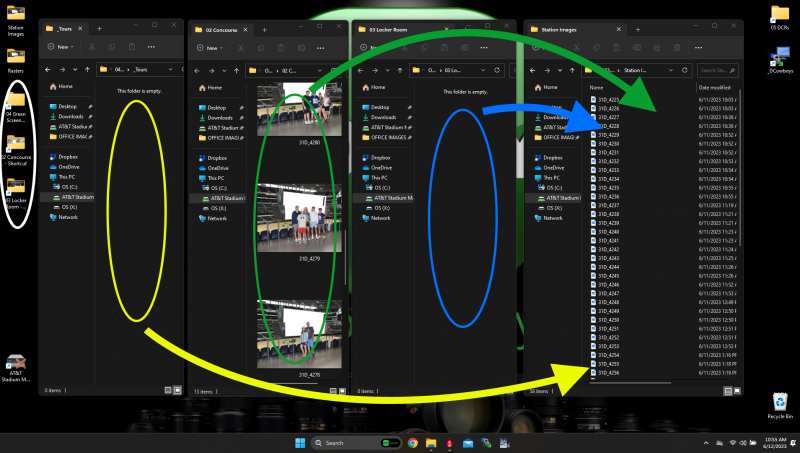
Now you need to backup all of the photos located in the various photo op location folders in Office Images.
Open each photo op location by either using the short cuts on the desktop or navigating to them using File Explorer.
Shrink down your windows so that you can see them all and then MOVE the photos from your Photo Op folder In Office Images, to the Station Images folder you created in today's folder. Once moved, repeat the same process for each of the Photo Op folders.
When finished, each of the photo op location photos will still be located in Office Images, but they will all be empty. Be sure to check all locations, even if that location wasn't used today.
Note: If a pop up states a file already exists with that name and asks if you want to overwrite or skip, select SKIP and then delete the image from the Station Image or Raster folder on the desktop.
You will need to repeat Steps 1-3 for all station computers
STEP 4:
Upload Images to FTP
You will now need to upload all Rastered Images to the FTP so that we can process them to the website which makes them available for purchase online.
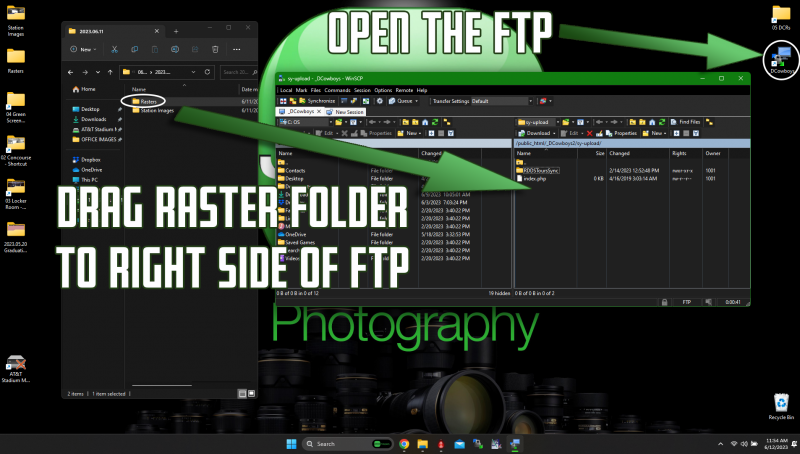
Open WinSCP to _DCowboys using the shortcut on the desktop and then Drag the Raster Folder from the today's date folder you created on AT&T Stadium Main Storage to the right side of the FTP window.
You will see a pop up window with two progress bars. The bottom bar is for each individual file while the top bar is for the overall file transfer of all images.
When the upload has finished the window with the progress bars will disappear and you can then close both the FTP program and the AT&T Main Storage window.
STEP 5:
Process Images to Website
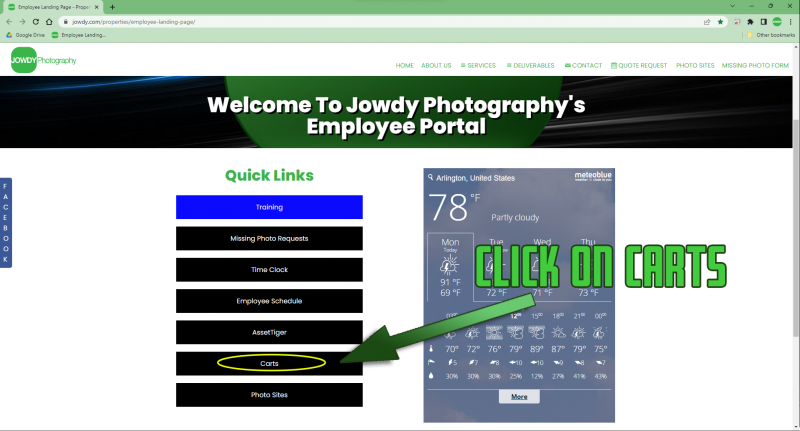
Once all Raster Images are uploaded to the FTP, you will need to process the images to the website. Open Chrome Browser and it will open to the internal Jowdy Home Page.
Click on Carts to see all available photo carts.
Note: The Carts link will take you to the back end of the sites so that you can upload/manage images. The Photo Sites link will take you to the customer facing pages
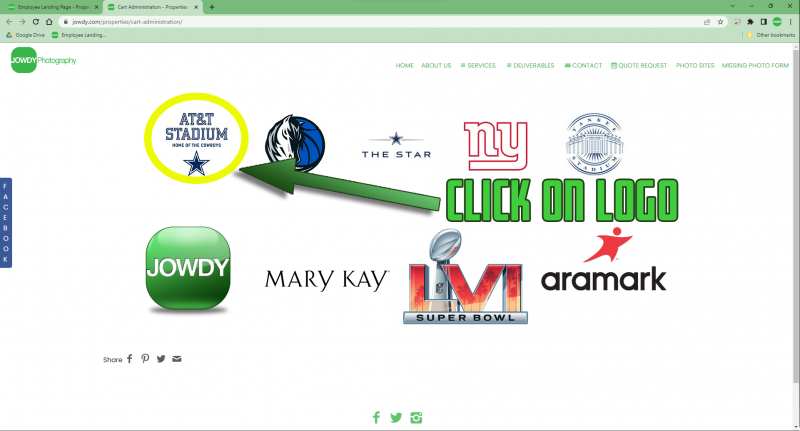
Select the AT&T Stadium/Dallas Cowboys Logo to open the back end of the _DCowboys cart.
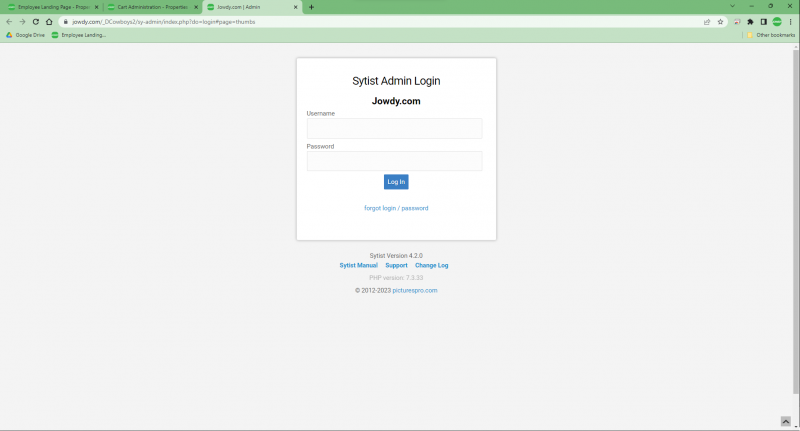
Enter User Name and Password
Note: See your Manager if you do not have a User Name/Password
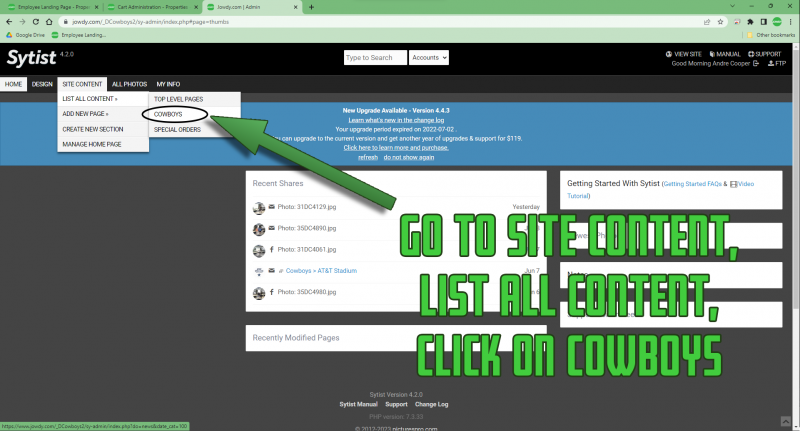
This will bring you to the dashboard of the Cowboys cart. On the menu at the top, highlight over (but don't click) SITE CONTENT, then hover over (but don't click) LIST ALL CONTENT, and then click COWBOYS
Note: Be careful when moving over to select COWBOYS. It is very easy to have your mouse travel a little to far down and hover over ADD NEW PAGE which also has a COWBOYS on the next menu but is NOT the correct place.
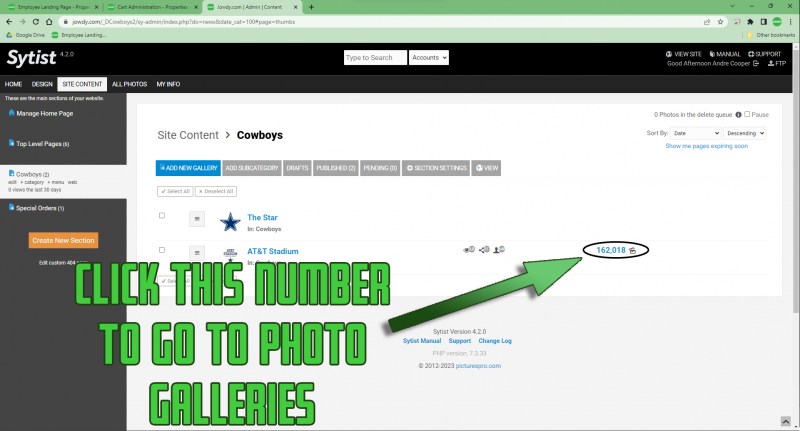
You now have the option to choose The Star or AT&T Stadium. For tours, you will need to go to AT&T Stadium. The fastest way is to click the large number to the right of AT&T Stadium.
Note: You can also get there by clicking on AT&T Stadium but then you will need to click on the ALL PHOTOS button. The method above saves you from having to do that step and takes you directly there.
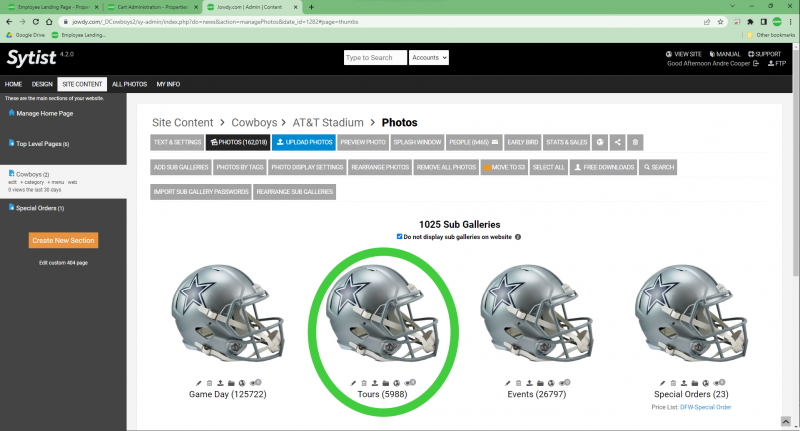
From here, you can choose the type of event you are uploading photos for. In this case, click on Tours.
Just like when backing up to the server, you will now need to select the current month.
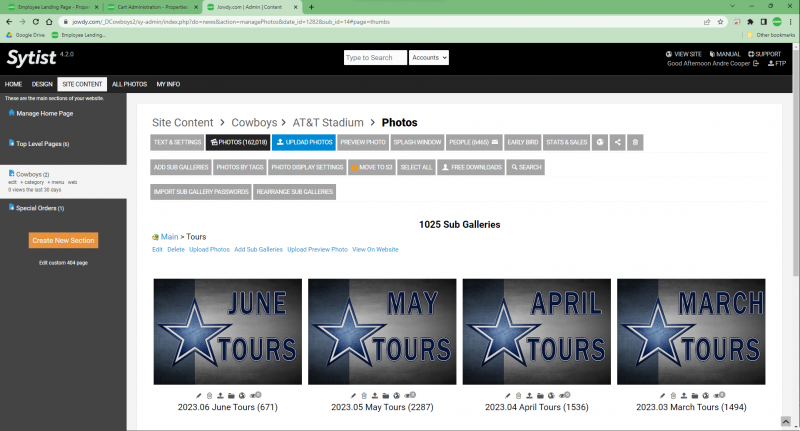
Just like when backing up to the server, you will now need to select the current month.

Create Sub Gallery
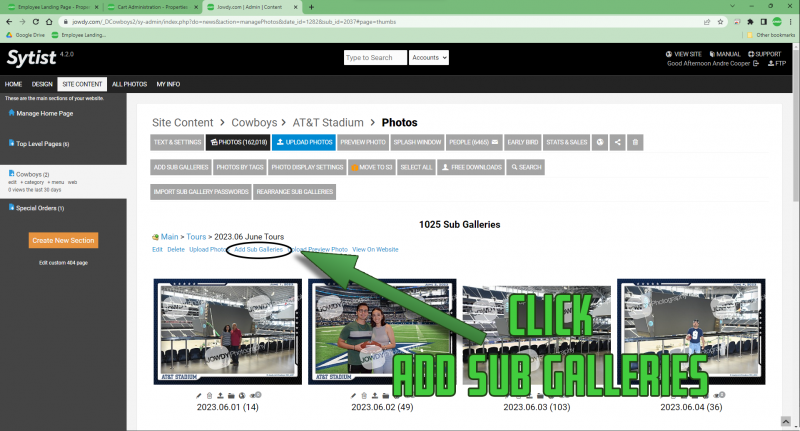
You will now need to create the sub gallery for today's photos. To do this, click "Add Sub Galleries."
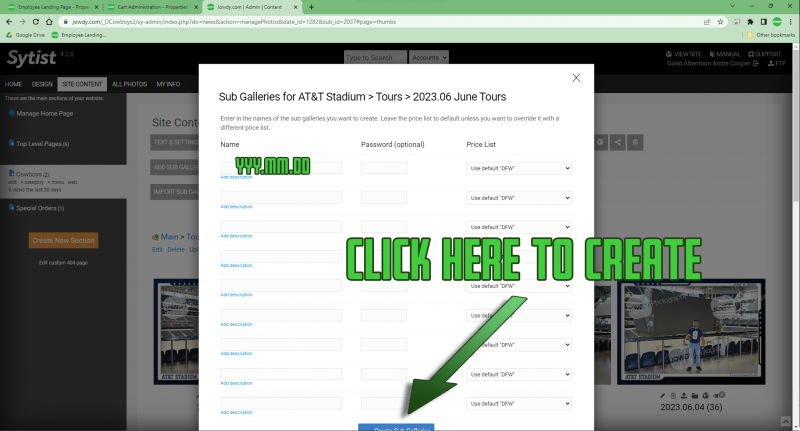
Enter the name of the new sub gallery with today's date in the YYYY.MM.DD format and then click the Create Sub Batteries button at the bottom.
Example: 2023.06.12
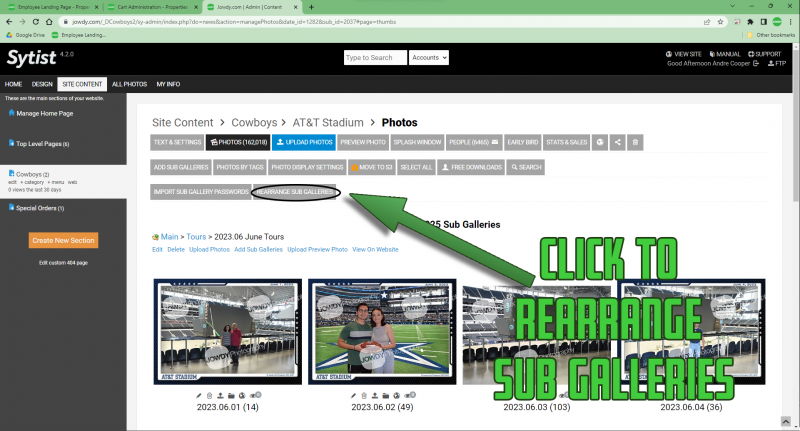
Now that you created your sub gallery for today's photos, you may notice that it puts that sub gallery in a random spot in that Month's gallery.
You will need to click REARRAGE SUB GALLERIES to fix this.
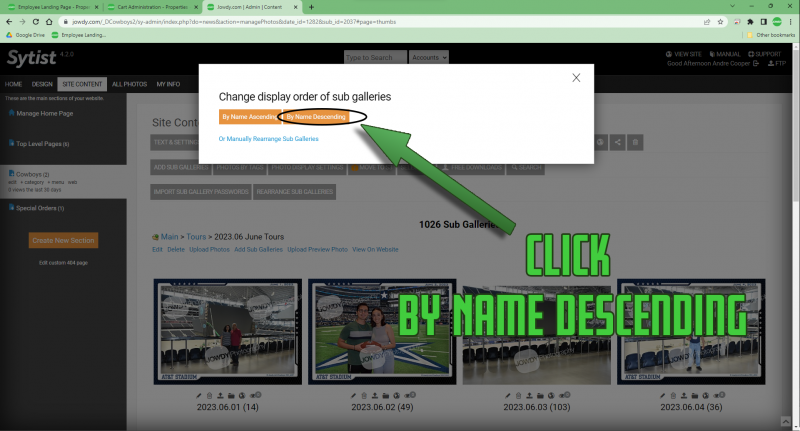
Click By Name Descending to have today's sub gallery at the top.
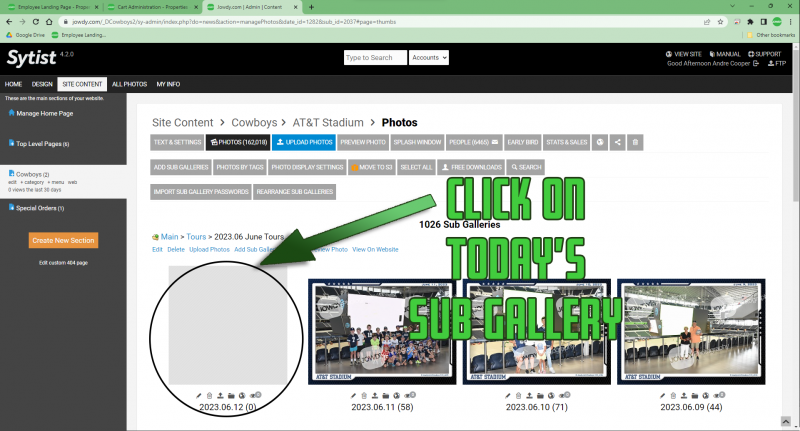
Click on today's Sub Gallery
Upload Photos
Now it is time to upload the photos from the FTP Server to the website.
PAY ATTENTION TO THIS NEXT STEP
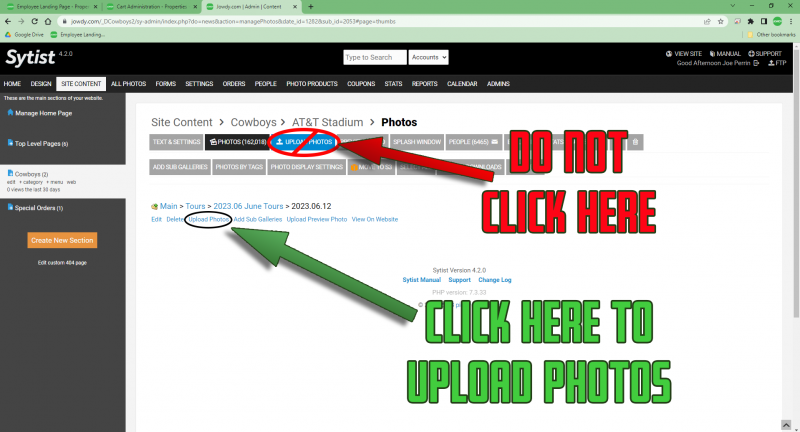
When inside of the sub gallery, there are TWO different buttons that say Upload Photos but only ONE of these will put the photos in the correct place.
Up at the top of the page there is a bright blue button that says UPLOAD PHOTOS. This is NOT the one you want to use. This will upload all photos directly to the Cowboys page and NOT in the sub gallery you just created.
Instead, down below all of the buttons are a list of text links. This is where you will click Upload Photos.
Note: If you ever go to Jowdy.com/Cowboys and see photos instead of just the search box, this is how that happened. You will then need to go move all of the photos into the correct sub gallery.
After clicking Upload Photos, a new window will pop up with the details on what and how you would like to upload.
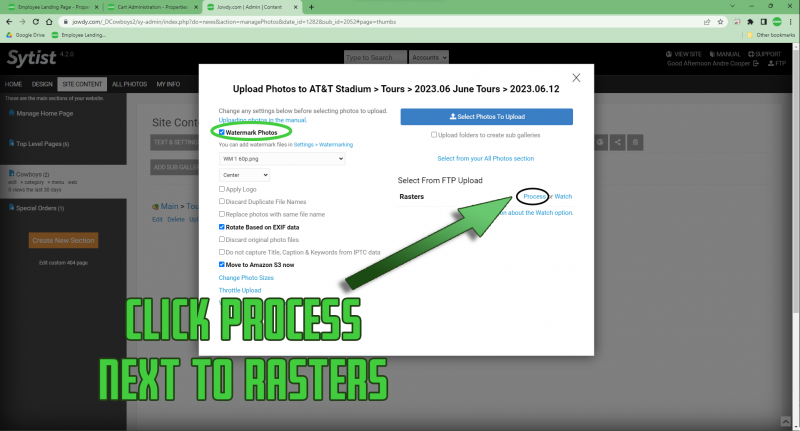
First make sure the watermark box is checked
On the right side of the new window, you should see Rasters listed there. To the right of that, click the link that says Process.
You will now begin to see the photos process to the website. It will upload a few at a time, then pause 10 seconds, and then upload more. This will continue until all photos are uploaded and then it will go back to the sub gallery, showing all photos uploaded.
At this time, you are finished and can log out and close the browser.
