POINT OF SALE (POS) OPERATIONS
Our POS System is easily manageable and simple to learn and operate. This training will guide you through the basic understanding of how the system is laid out.
STEP 1:
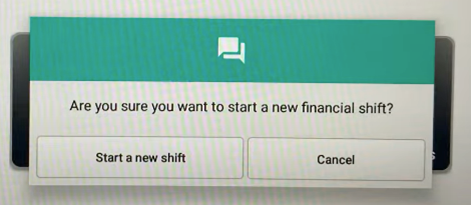
The first step is to log in and start a new shift. If you are the first one to interact with the POS for that day, you will need to start a new shift in the system to record that day's worth of sales. Use the touch screen to select "Point of Sale" and then select "Start a new shift" to open and record a new day's worth of sales.

STEP 2:
Ringing Up a Transaction
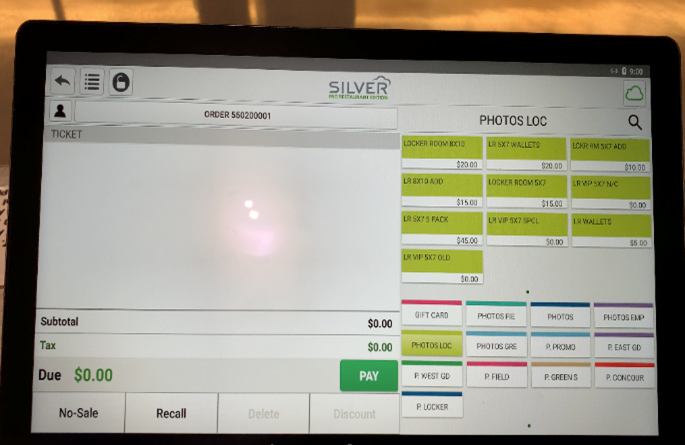
The main screen is basically divided into 3 sections. The left half of the screen shows what items have been added to the current transaction. The right half of the screen is divided into two parts (Sales categories on the bottom, items available to sell in those categories are on the top).
On the right, the sales categories (Field, Locker Room, Concourse, etc) are on the bottom part of the screen and the Items available to be sold in that category (5x7, 8x10, etc.) are on the top. The items on the top will change based on the category you select. You will select the category that matches the location of where to photo was taken, not where it was sold. For example, if the station is located on the concourse, but they are buying an 8x10 of a photo taken on the field, you would select the P. Field category and then the Field 8x10 item.
Each item you select will be shown on the left side of the screen under “TICKET.” To remove an item, simply swipe left on that item and select “Delete.” Once all items have been added, simply hit the green “PAY” button on the bottom of the screen, select “Credit Card” and hit the green “DONE” button to allow the customer to use the pin pad to pay.
Reminder: We only accept credit cards for all transactions

ENTERING PRIVATE VIP TOURS:
What is a Private VIP Tour?
There are 5 main types of tours: Public VIP, Private VIP, Self Guided, Art, and Owner's Experience.
- Public VIP: These tours are made up of a bunch of individuals who most likely do not know each other. They all just happened to buy tour tickets for the same time period.
- Private VIP: These tours are made up of people who belong together somehow. This could be a school, a company, an organization, etc. These tours tickets include a free 5x7 print for each person (unless otherwise noted on the tour notes).
- Self Guided: These guests do not get a tour guide. They have a designated route that they can take at their own pace.
- Art: Groups (usually schools) that take a unique tour focused on the stadiums art.
- Owner's Experience: Similar to a public VIP tour but it is a little shorter and includes a stop into the Owner's Club
How to Ring Up a Private VIP Tour's Free Photos?
- According to what was printed/listed on the tour sheet, input the number of photos printed
- Press the “P. Promo” Category and then select the item “PRIVATE VIP 5X7” button
- Enter the appropriate quantity
- Select “PAY” and ring up as cash (this item has a $0 retail price so no money will be taken)
- Email VIP Receipt to Joe@Jowdy.com
- Keep the VIP Tour Receipts to verify quantities at the end of the day
CLOSING PROCEDURES:
Close Out the Day's Shift
At the end of the day, you will use the back arrow at the top left of the screen, select “END SHIFT” and then confirm “End Shift” when the prompt asks if you are sure. This will print the end of day sales report which you will use to complete the DCR. Then just select “Clock Out” to end the day.TROUBLESHOOTING:
Offline Transactions
We must make sure that the cloud in the top right of the screen is not red. If it is a red cloud, you are offline and we will not be able to print an accurate end of day report.
If you are having issues, try these action items:
- Make sure the wifi connection is active (no red cloud)
- Restart the register (press and hold green light on the base of the POS)
- Connect POS via ethernet cable
- Relocate POS and try again
