Renaming A Camera
Renaming a camera to match a Photo ID Card is an important skill to learn. We utilize this feature in a wide variety of events from daily tours, game days, offsite events, and more. Setting the file names to match the ID card is what allows the guest to view their photos both onsite and online.
For this training, we will be using a Nikon D7000. If using a different Nikon, the process should be basically the same but the buttons may be in a slightly different location.
STEP 1:
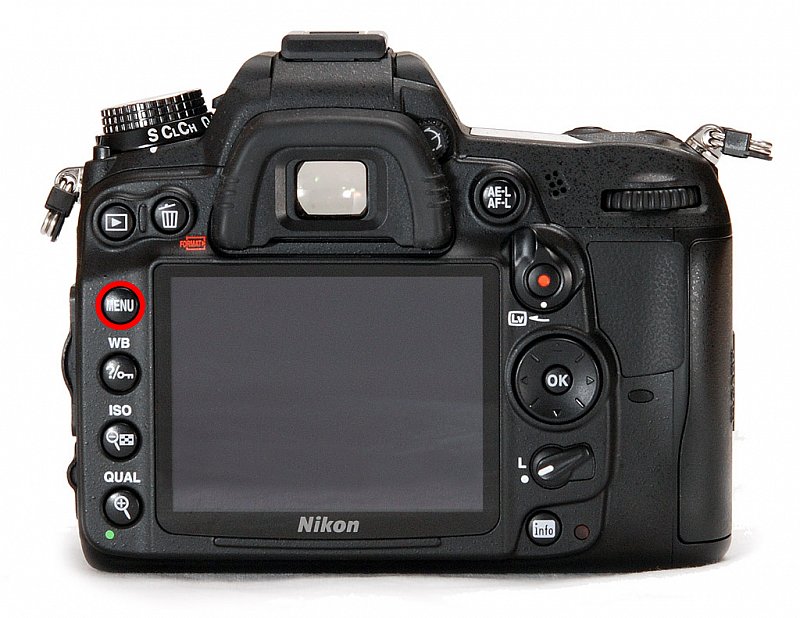
The first step is to access the camera settings. With the camera turned on, simply press the menu button. Which will bring up the menu on the back screen.
STEP 2:
Format the Memory Card
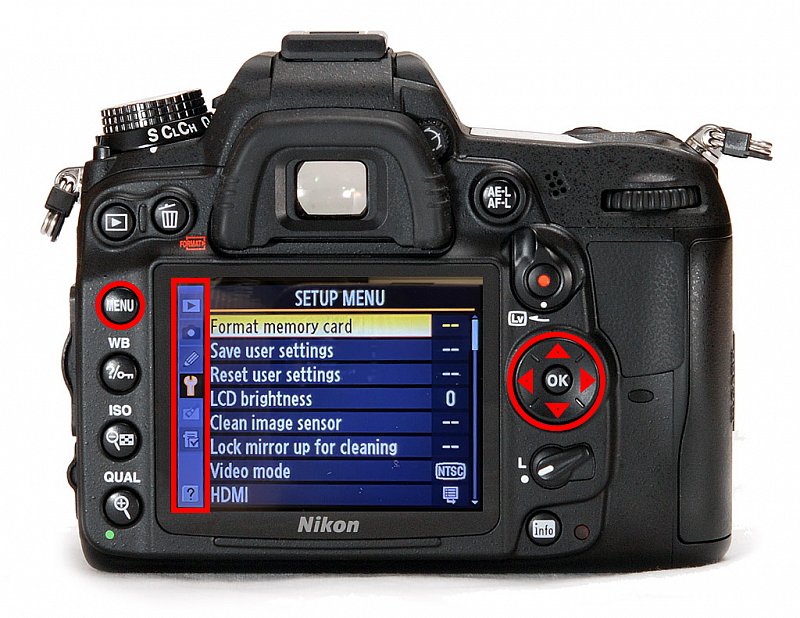
To format the memory card, you will use the directional pad (Dpad) to navigate to the wrench icon on the left of the screen. Highlight "Format memory card" and push the "OK" button inside of the Dpad.
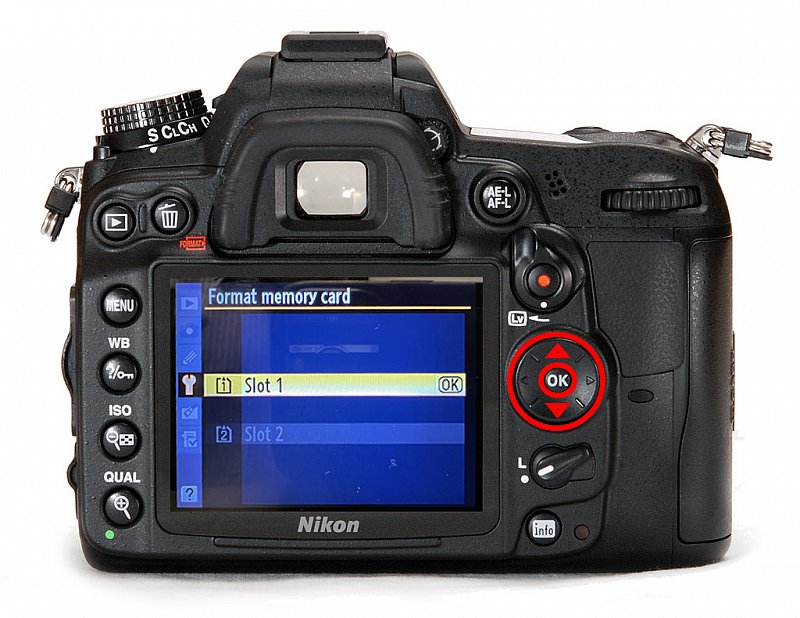
Use the Dpad to highlight the SD Card slot you want to format and press the "OK" button.
BE SURE THAT YOU HAVE BACKED UP ALL PHOTOS BEFORE TAKING THIS STEP
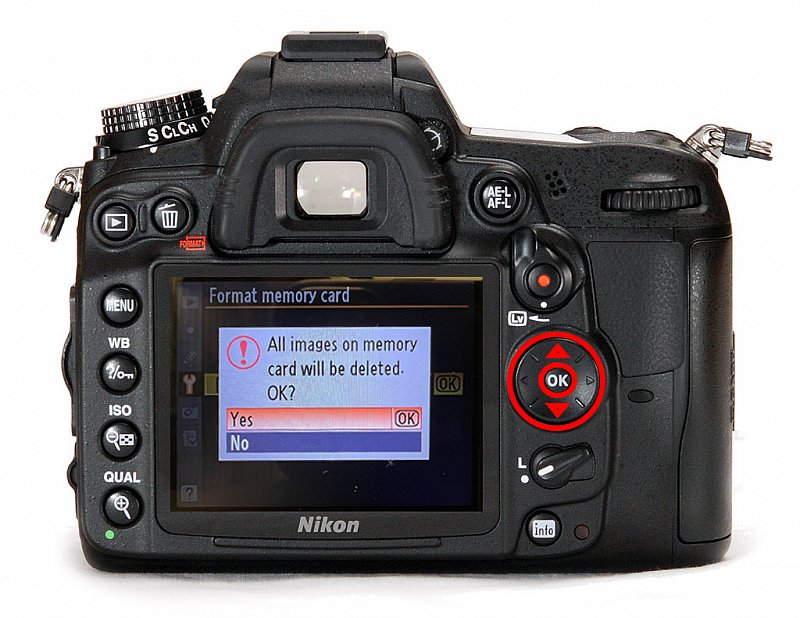
The camera will ask you to confirm the formatting of the card. Use the Dpad to go up to "Yes" and press the "OK" button. It will then format the card, erasing everything off of the card.
STEP 3:
Set Image Prefix Name
Using the Dpad, navigate to the camera icon from the menu on the left of the screen. Be sure to chose the camera and NOT the video camera. Highlight "File naming" and press the "OK" button.
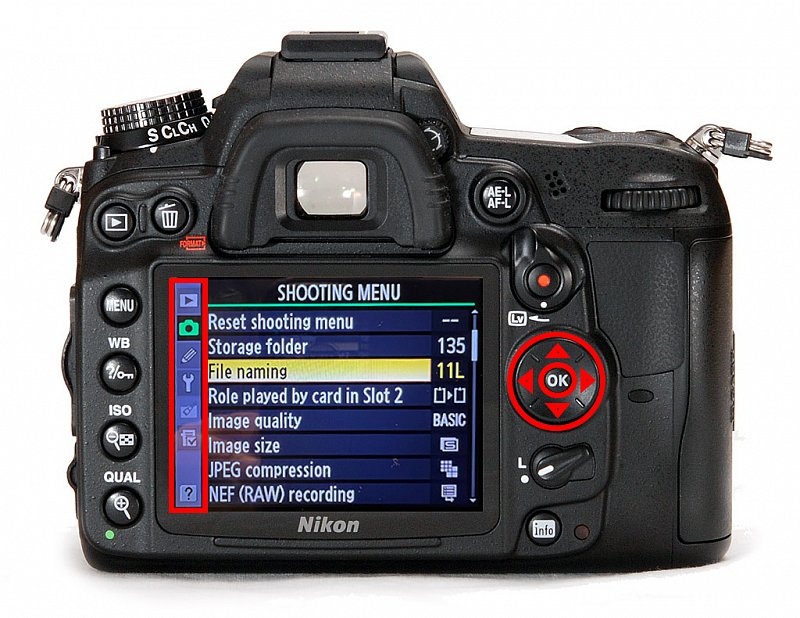
This screen shows you what your camera prefix is currently setup as. We are only looking at the sRGB format. Press the "OK" button to change the name.
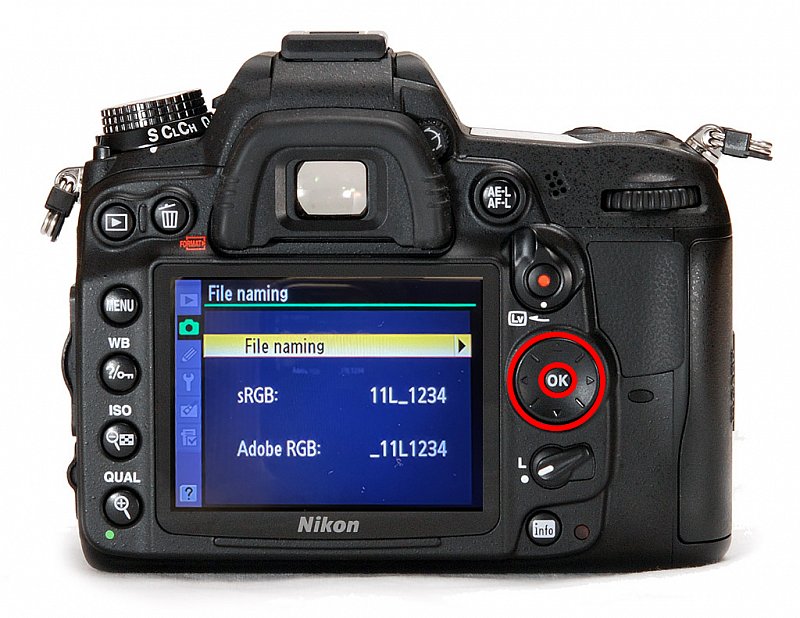
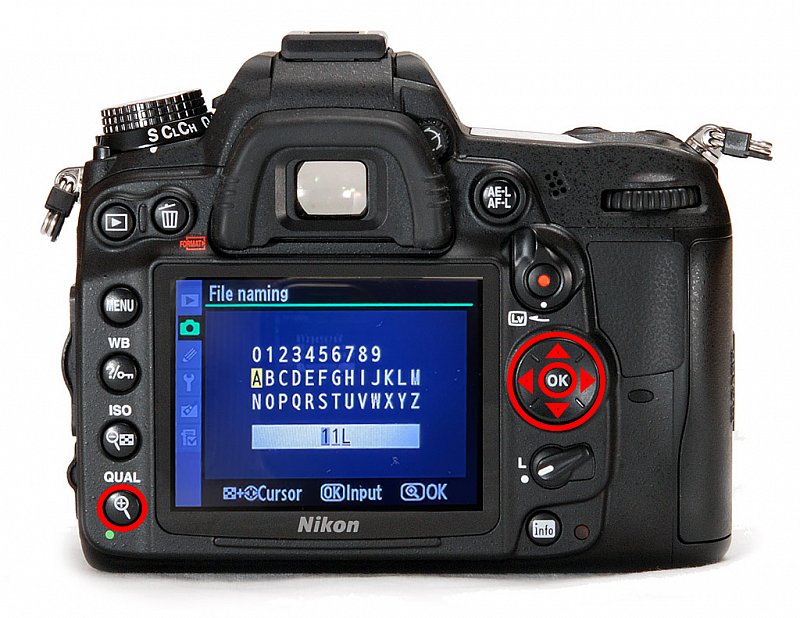
Use the Dpad to highlight the number/letter needed and press "OK" to select that number/letter. Repeat until it matches your Photo ID Card. When you have the name correct, you will need to press the "+ Magnification" button to confirm and set the name.
It is a good practice to go back to the review screen to ensure the name was set correctly.
STEP 4:
Reset File Sequence Number
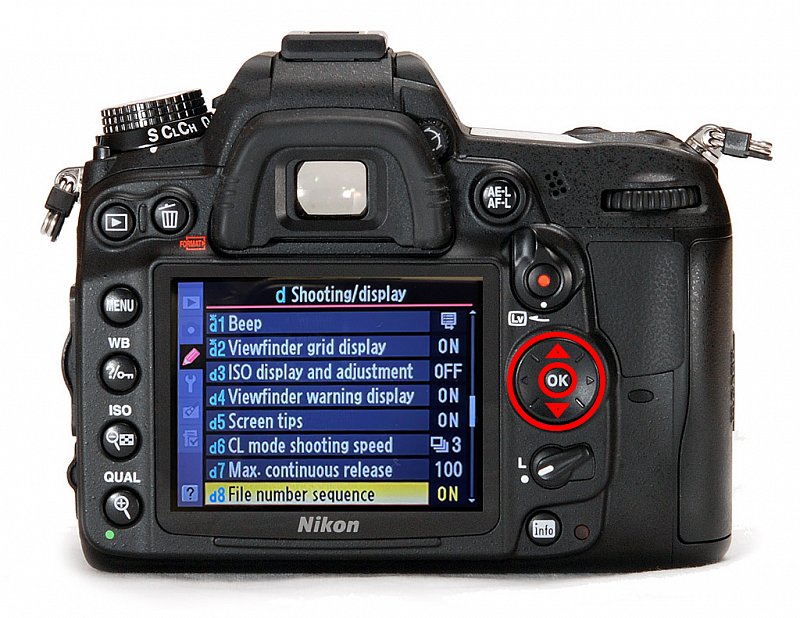
Now that we have set the Image Prefix to match the Photo ID Card, we still need to make the last 4 digits of the image name match the Photo ID Card. We do that by resetting the File Sequence Number. Using the Dpad, navigate to the "pencil" icon on the menu, highlight "d Shooting/display," and press the "OK" button.
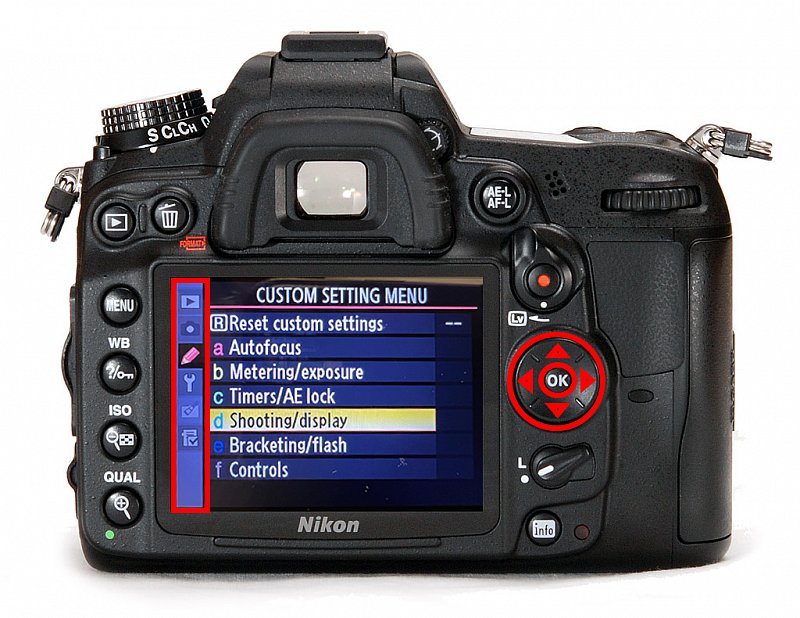
Using the Dpad, navigate down to "d8 File number sequence" and press the "OK" button.
Note: Depending on what menu was accessed last, you may need to scroll up/down a lot to get to d8.
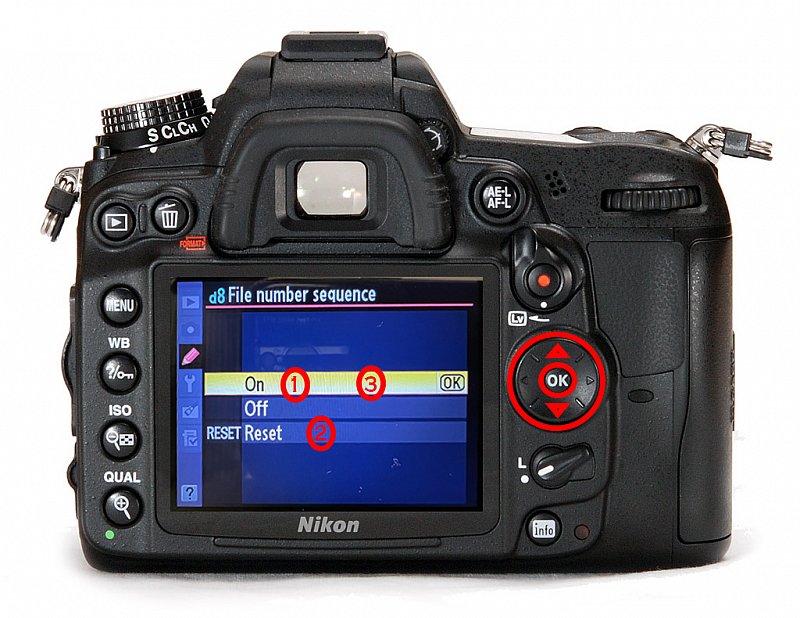
When resetting the file number sequence, cameras can tend to be a little temperamental. Because of this, we have a set of extra steps to help ensure it resets correctly. When in the "d8 File number sequence" menu you will use the dpad to highlight "On" and press the "OK" button. This will take you out of the menu and back onto the last screen.
Go back into "d8 File number sequence" and use the Dpad to highlight "Reset" and press the "OK" button. This will again take you to the previous screen.
Once again go back into "d8 File number sequence," highlight "On" and press the "OK" button.
This will reset your file numbers back to _0001 and cause each photo to increase the name by 1.
STEP 5:
Name Image to match Photo ID Card
Now that the Image Numbers have been reset, the next step is to get your first shot to match the Photo ID Card. To do this you'll follow a few simple steps both on, and off of the camera. You will need a PC to complete this last step.
- Take a test shot
- Be sure to look at the file name as see that the Image prefix matches the card and that it is _0001
- For example: 14D_0001 -- If this does not match your card, start back at step 1 of the whole process.
- Remove the SD Card and place in PC
- Navigate to the image you just took and rename the image to 2 numbers before your first card.
- For example: If your next Photo ID Card is 14DC1427 then you'll rename that file as 14D_1425
- Put the SD Card back into the camera
- Take another test shot (ideally of the Photo ID Card so it can be matched up)
- Look at the image number on the back of the camera. If done correctly, it should be the number right before your first Photo ID Card.
- To continue with the previous example, your new photo's name should be 14D_1426 this way the next photo you take of will match the Photo ID Card.
- IF IT DOES NOT MATCH - YOU WILL HAVE TO START BACK AT THE FIRST STEP OF THE WHOLE PROCESS
